2023. 7. 22. 20:54ㆍSpring 기초
들어가며
이번 포스팅에서는 SpringBoot 환경에서 GraphQL을 간단히 실습해봅니다.
GraphQL에 대한 소개와 설명은 이전 포스팅을 참고해주세요.
Spring에서 공식적으로 Spring for GraphQL을 Release했습니다.
다만, Spring for GraphQL을 사용하시려면 SpringBoot 버전을 2.7 이상으로 맞춰주셔야 합니다.

위의 사진에서 release announcement 링크는 아래에 있습니다.
Spring for GraphQL이 QueryDSL도 지원하며, HTTP나 WebSocket 클라이언트에서도 사용할 수 있다고 합니다.
Spring 예제처럼 Graphql을 이용한 PetClinic 프로젝트 코드도 찾아볼 수 있습니다.
https://spring.io/blog/2022/05/19/spring-for-graphql-1-0-release
Spring for GraphQL 1.0 Release
On behalf of the Spring for GraphQL team and every contributor, it is my pleasure to announce the 1.0 GA release. It's been 10 months since the project was announced and under 2 years since the first commit, unremarkably called "first commit". The project
spring.io
환경설정
설정한 내용들을 주절주절 적어놓았으니 빠른 실습을 원하신다면 gradle의 dependencies와 yml만 복붙하고 실습으로 넘어가셔도 무방합니다.
필자는 아래 환경에서 실습했습니다.
Java - 17
SpringBoot - 2.7.13
DB - MySQL 8 (JPA Hibernate)
GraphQL을 이용하기 위해서는, build.gradle에 아래 의존성을 추가해야 합니다.
implementation 'org.springframework.boot:spring-boot-starter-graphql'
dependencies
dependencies{
    implementation 'org.springframework.boot:spring-boot-starter-graphql'
    implementation 'org.springframework.boot:spring-boot-starter-data-jpa'
    implementation 'org.springframework.boot:spring-boot-starter-web'
    compileOnly 'org.projectlombok:lombok'
    runtimeOnly 'com.mysql:mysql-connector-j'
    annotationProcessor 'org.projectlombok:lombok'
    testImplementation 'org.springframework.boot:spring-boot-starter-test'
    testImplementation 'org.springframework:spring-webflux'
    testImplementation 'org.springframework.graphql:spring-graphql-test'
}
application.yml
spring:
  datasource:
    driver-class-name: com.mysql.cj.jdbc.Driver
    url: jdbc:mysql://localhost:3306/graphql  #DB가 없을 경우 생성해야 합니다.
    username: root
    password: 1234

  jpa:
    database: mysql
    open-in-view: false
    hibernate.ddl-auto: update
    show-sql: true
    properties:
      hibernate:
        format_sql: true
        dialect: org.hibernate.dialect.MySQL8Dialect

  graphql:
    graphiql:
      enabled: true
    schema:
      printer:
        enabled: true
      locations: classpath:graphql/**/
application.yml에서 spring과 jpa 설명은 생략하겠습니다.
graphql 관련해서는 다음 세개의 옵션을 설정했습니다.
graphql.graphiql.enabled: true
graphql.schema.printer.enabled: true
graphql.schema.locations: classpath:graphql/**/
1. graphql.graphiql.enabled
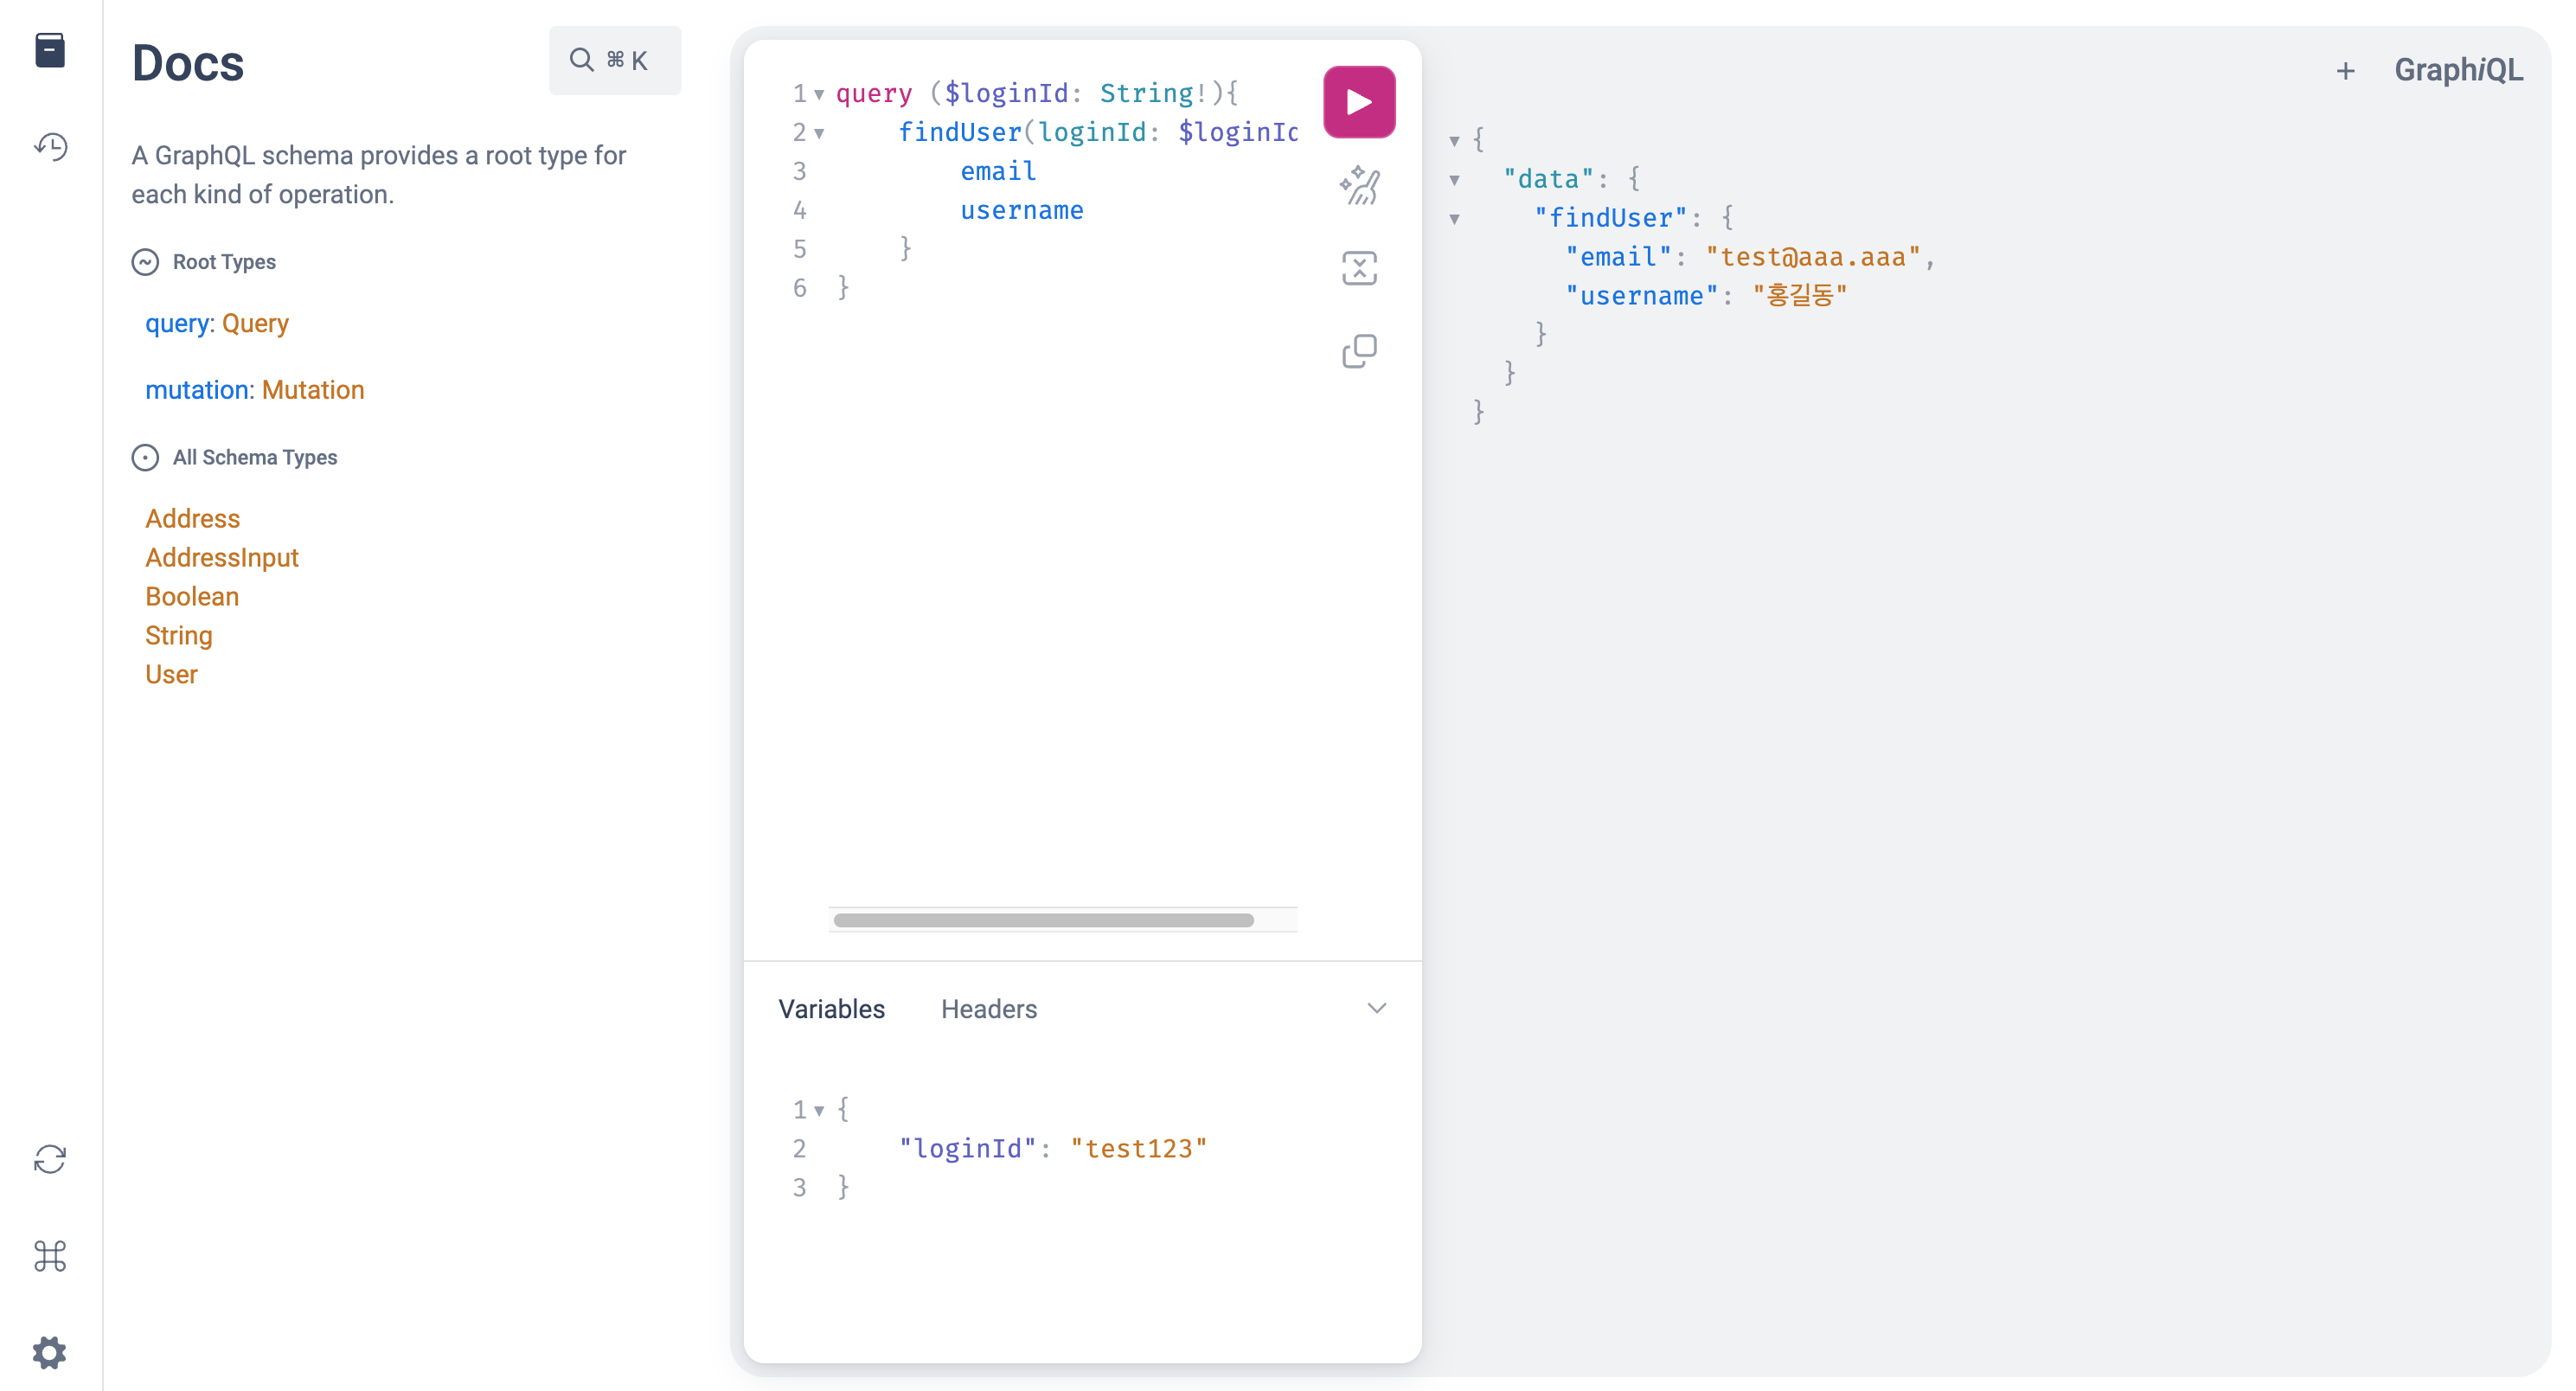
작성된 쿼리 목록을 Docs로 제공하며, 쿼리 테스트가 가능한 GUI를 사용할 지 설정할 속성입니다.
API 테스트를 할 때, Postman보다 아래 GUI가 더 좋은 것 같습니다. 실습에도 GUI를 사용했습니다.
무엇보다 미리 생성해 둔 스키마 정보와 타입을 알려주는 Docs 기능이 참 마음에 드네요.
yml에서 위의 옵션을 true로 설정하고 '/graphiql'로 접속하면 이용 가능합니다.
2. graphql.schema.printer.enabled
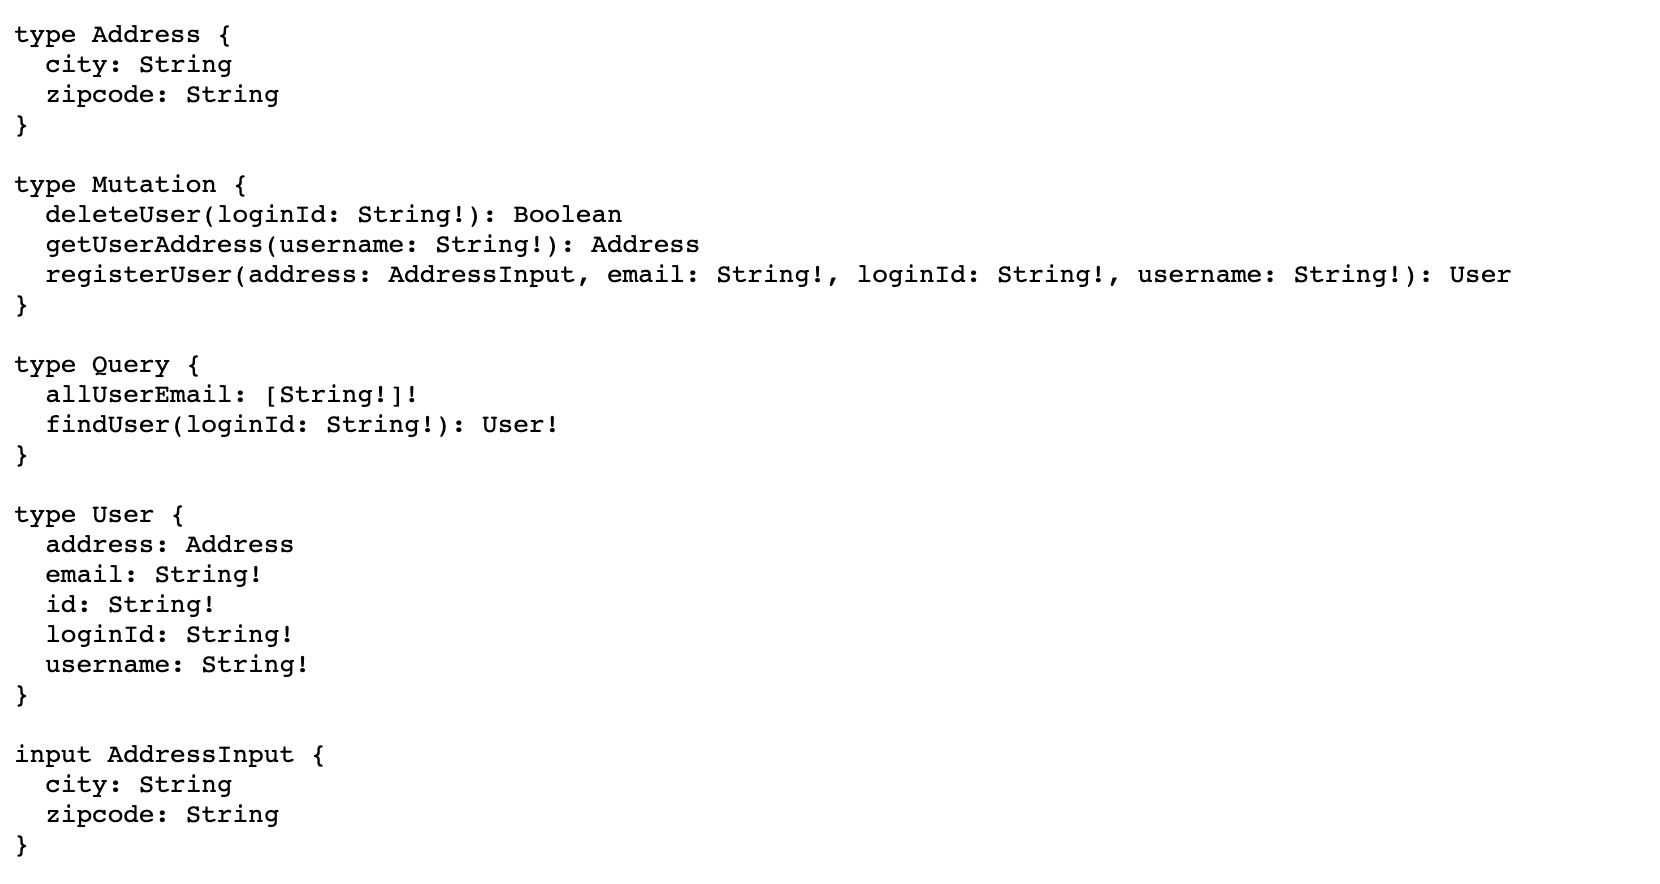
스키마를 출력하는 엔드포인트를 활성화 할 지 지정할 수 있는 속성입니다.
만약 true로 설정할 경우 '/schema' 로 접속하면 아래와 같이 작성한 schema 파일을 확인할 수 있습니다.
저는 이것저것 설정해보다가 true로 두었는데, 이 엔드포인트가 보안 취약점이 될 수 있다고 생각되어 false(기본값)로 두는 것이 적절하다고 생각합니다.
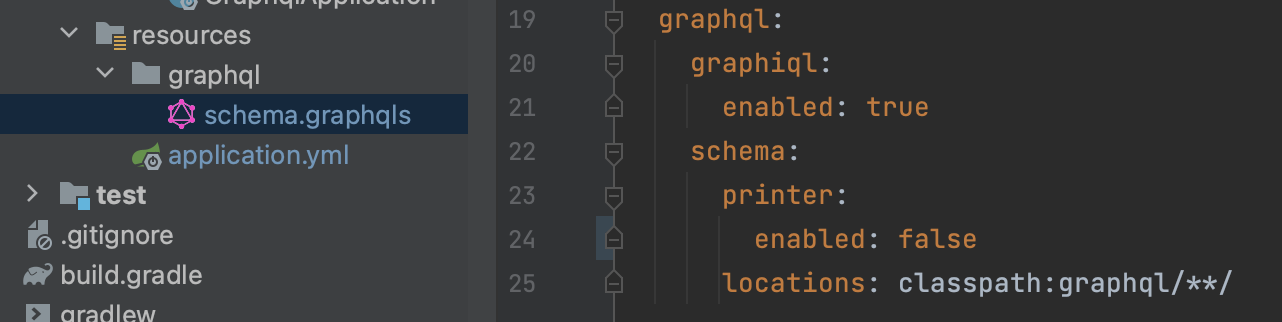
3. graphql.schema.locations
schema 파일의 위치를 지정하는 속성입니다.
저는 resources 디렉토리 하위에 graphql 디렉토리를 생성하였고 그 안에 schema 파일을 두었습니다.
그리고 locations 값을 아래와 같이 설정하여 schema 파일을 읽어 사용할 수 있도록 했습니다.
이외에도 필요한 속성들은 아래의 문서에서 찾으실 수 있습니다.
기본적으로 graphql은 하나의 엔드포인트를 사용하며, default path는 /graphql입니다.
이 역시도 설정을 통해 변경할 수 있습니다.
Common Application Properties
docs.spring.io
실습
저는 유저 엔티티를 가지고 실습을 진행했습니다.

User Entity
@Entity
@Getter
@Table(name = "users")
@NoArgsConstructor
public class User {

    @Id
    @GeneratedValue(strategy = IDENTITY)
    private Long id;

    @Column(length = 10, nullable = false, unique = true)
    private String loginId;

    private String username;

    private String email;

    @Embedded
    private Address address;

    public User(String loginId, String username, String email, Address address) {
        this.loginId = loginId;
        this.username = username;
        this.email = email;
        this.address = address;
    }
}
schema.graphqls
위 스키마에서 1) 어떤 종류의 쿼리, 뮤테이션을 요청할 수 있는지, 2) 어떠한 필드가 있는지 정의합니다.
schema {
    query: Query,
    mutation: Mutation
}

#쿼리 목록
type Query {
    findUser(loginId: String!): User!
    allUserEmail: [String!]!
}

#뮤테이션 목록
type Mutation {
    registerUser(loginId: String!, username: String!, email: String!, address: AddressInput): User
    deleteUser(loginId: String!): Boolean
    getUserAddress(username: String!): Address
}

input AddressInput {
    city: String
    zipcode: String
}

type User {
    id: String!
    loginId: String!
    username: String!
    email: String!
    address: Address
}

type Address{
    city: String
    zipcode: String
}
총 두 개의 쿼리와 세 개의 뮤테이션을 정의했습니다.
graphQL을 이용하려면, 타입에 대한 이해가 먼저 필요합니다.
유저를 단건 조회하는 findUser 쿼리를 예시로 설명드리겠습니다.
Query
#schema.graphqls

schema {
    query: Query,
    mutation: Mutation
}

type Query {
    findUser(loginId: String!): User!
    ...
}

type User {
    id: String!
    loginId: String!
    username: String!
    email: String!
    address: Address
}

type Address{
    city: String
    zipcode: String
}
먼저, type Query 필드에 findUser라는 쿼리문을 정의합니다.
findUser라는 쿼리는 매개변수로 loginId를 받으며, User 타입을 반환한다고 정의했습니다.
여기서 loginId에 붙은 느낌표(!)는 필수 값이라는 의미입니다. findUser라는 쿼리를 사용할 때 반드시 넣어야 합니다.
type Query {
    findUser(loginId: String!): User!
}
그리고 findUser의 반환 타입을 User 타입으로 정의했습니다.
아래에는 User타입에 대한 정의입니다. User 타입은 UserId, loginId, username, email, address를 가지고 있다고 정의합니다.
그중 address를 제외한 모든 값을 필수적으로 가지고 있어야 한다고 정의했습니다.
그 아래에는 Address 타입을 정의합니다.
city, zipcode 필드를 가지고 있으며 쿼리를 호출했을 때 값이 있을수도, 없을수도 있습니다.
type User {
    id: String!
    loginId: String!
    username: String!
    email: String!
    address: Address
}

type Address{
    city: String
    zipcode: String
}
더미 데이터 추가

위와 같은 User 데이터를 한 건 넣었습니다.
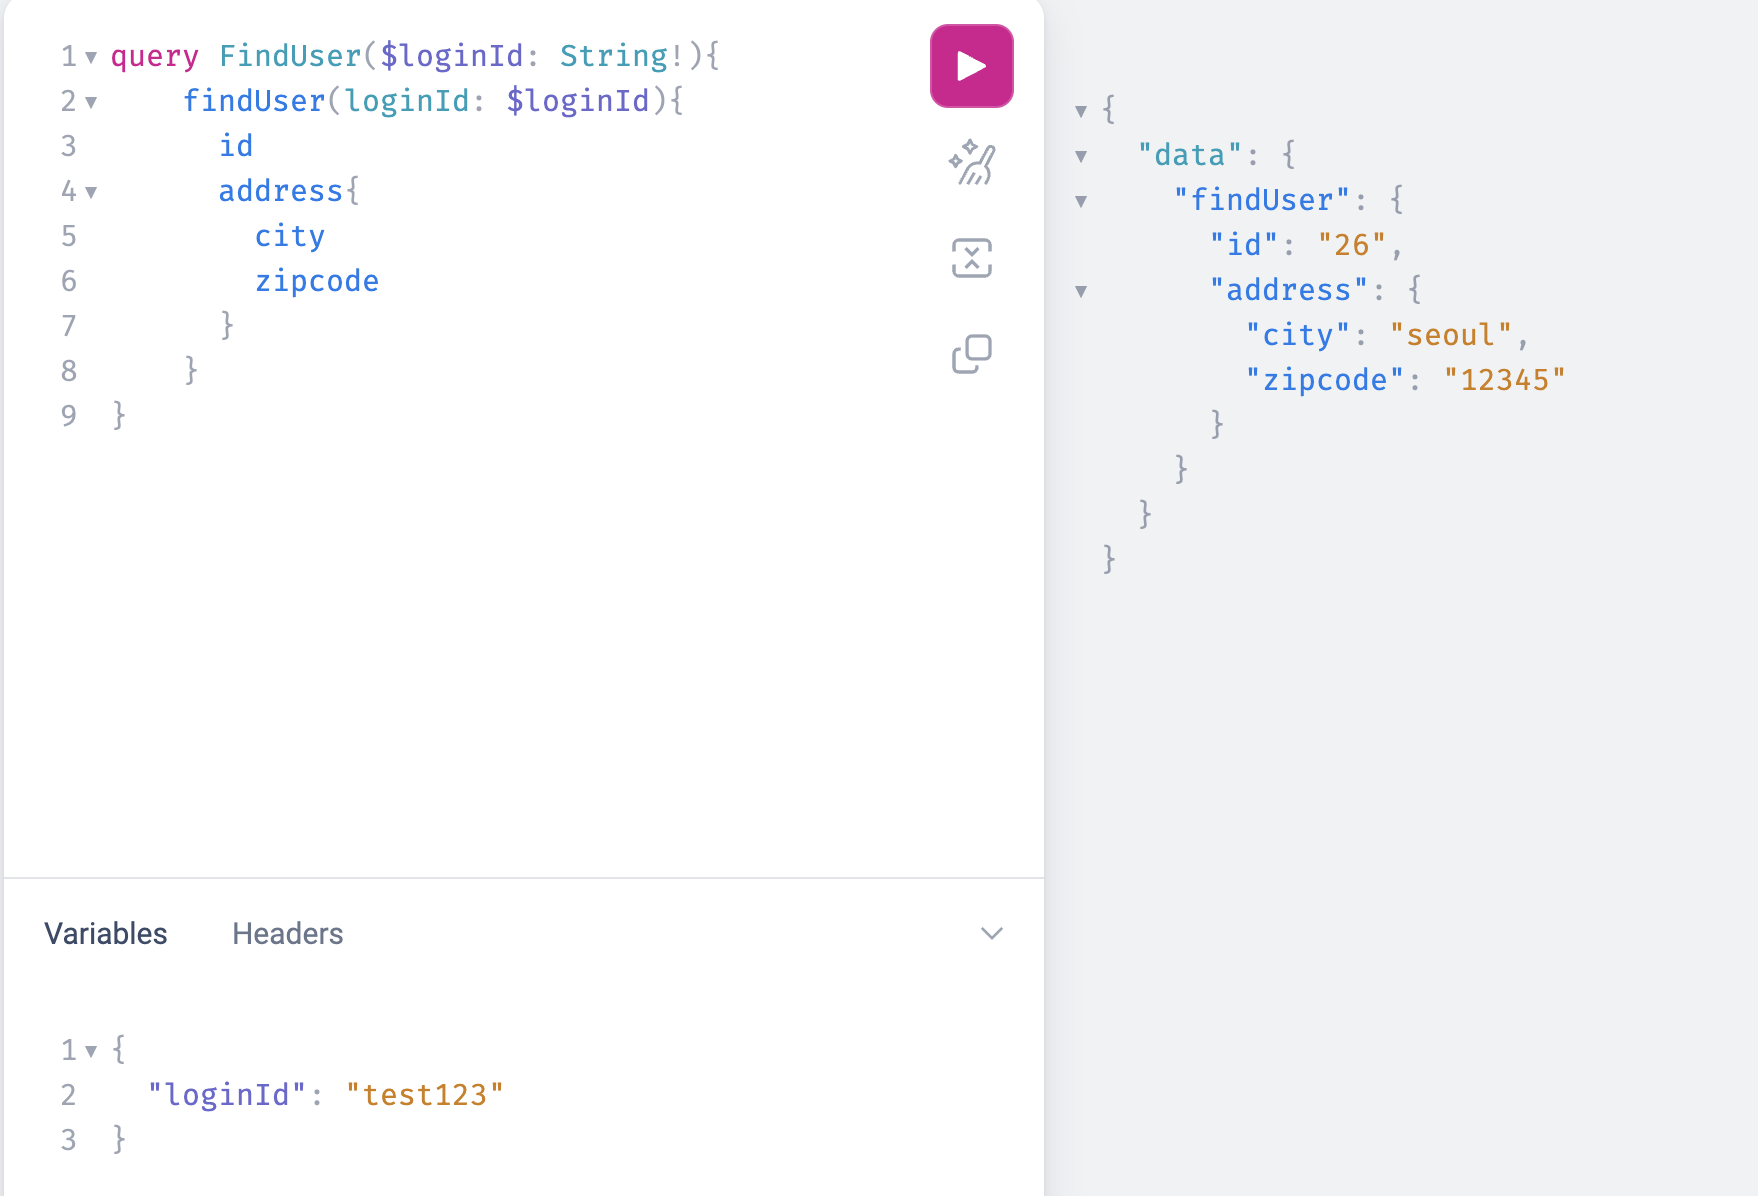
findUser 쿼리를 이용해 User의 정보를 조회해보겠습니다.
필수 파라미터인 loginId는 json 형식으로 입력합니다.
여기서는 파라미터를 변수로 받는 오퍼레이션 쿼리를 이용했습니다.
오퍼레이션 쿼리는 이전 포스팅을 참고해주세요.

성공적으로 더미데이터 정보를 가져왔습니다.
여기서 GraphQL이 강력한 이유는 기존 REST 방식의 over-fetching, under-fetching 문제를 극복할 수 있기 때문입니다.
만약 응답 데이터 중 email과 username이 불필요해진 상황이라면 다음과 같이 쿼리에서 제거하면 됩니다.
Mutation
다음으로 registerUser라는 Mutation을 사용해보겠습니다.
먼저 schema.graphqls에 다음과 같이 뮤테이션을 정의합니다.
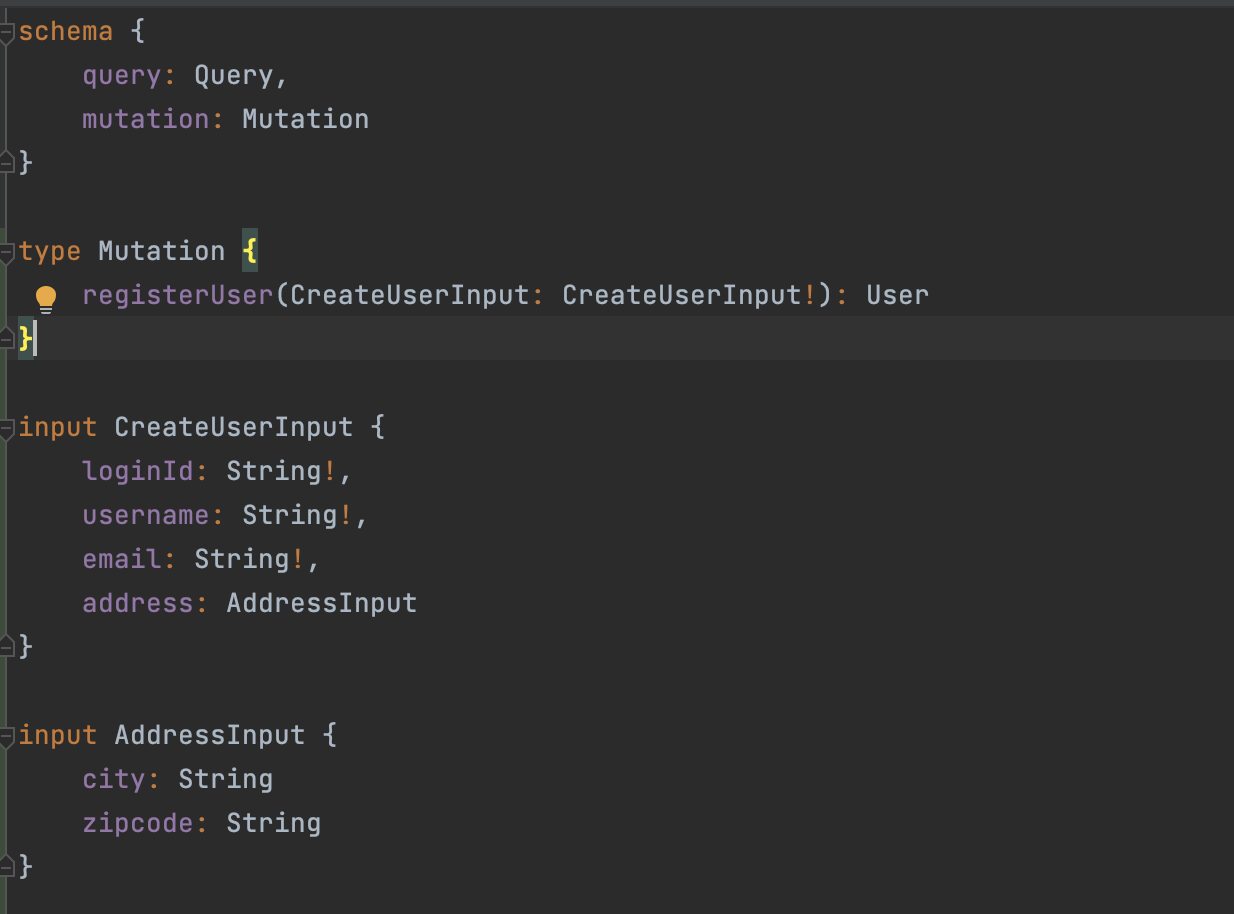
registerUser는 파라미터로 CreateUserInput 타입을 받으며 User 타입을 반환합니다.
사용하게 될 CreateUserInput 타입과 AddressInput 타입도 추가로 정의했습니다.
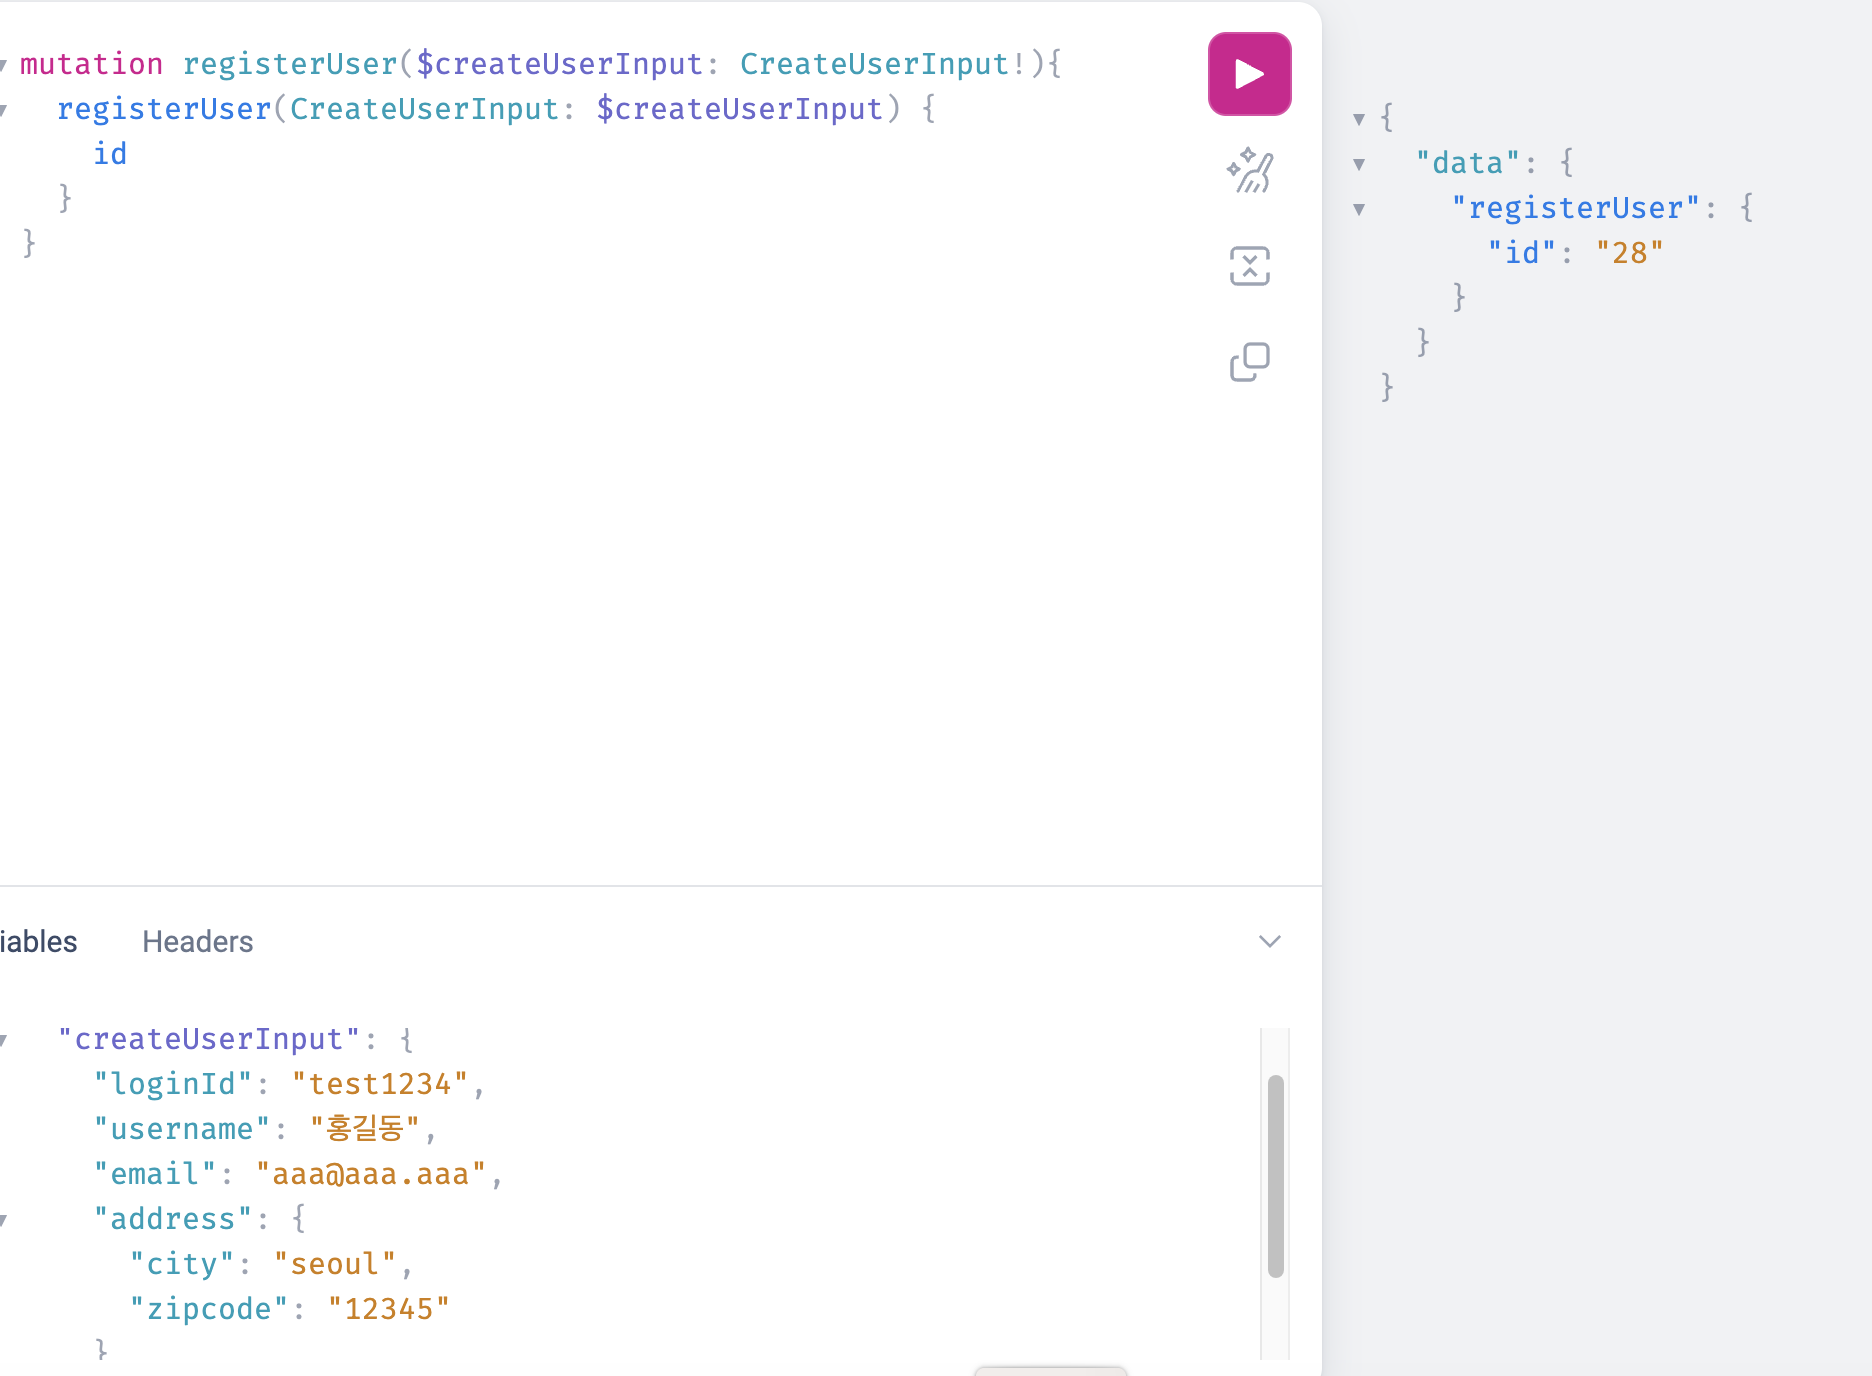
그리고 CreateUserInput 타입에 맞추어서 json을 전송하면 뮤테이션이 동작하고 response를 가져옵니다.
컨트롤러
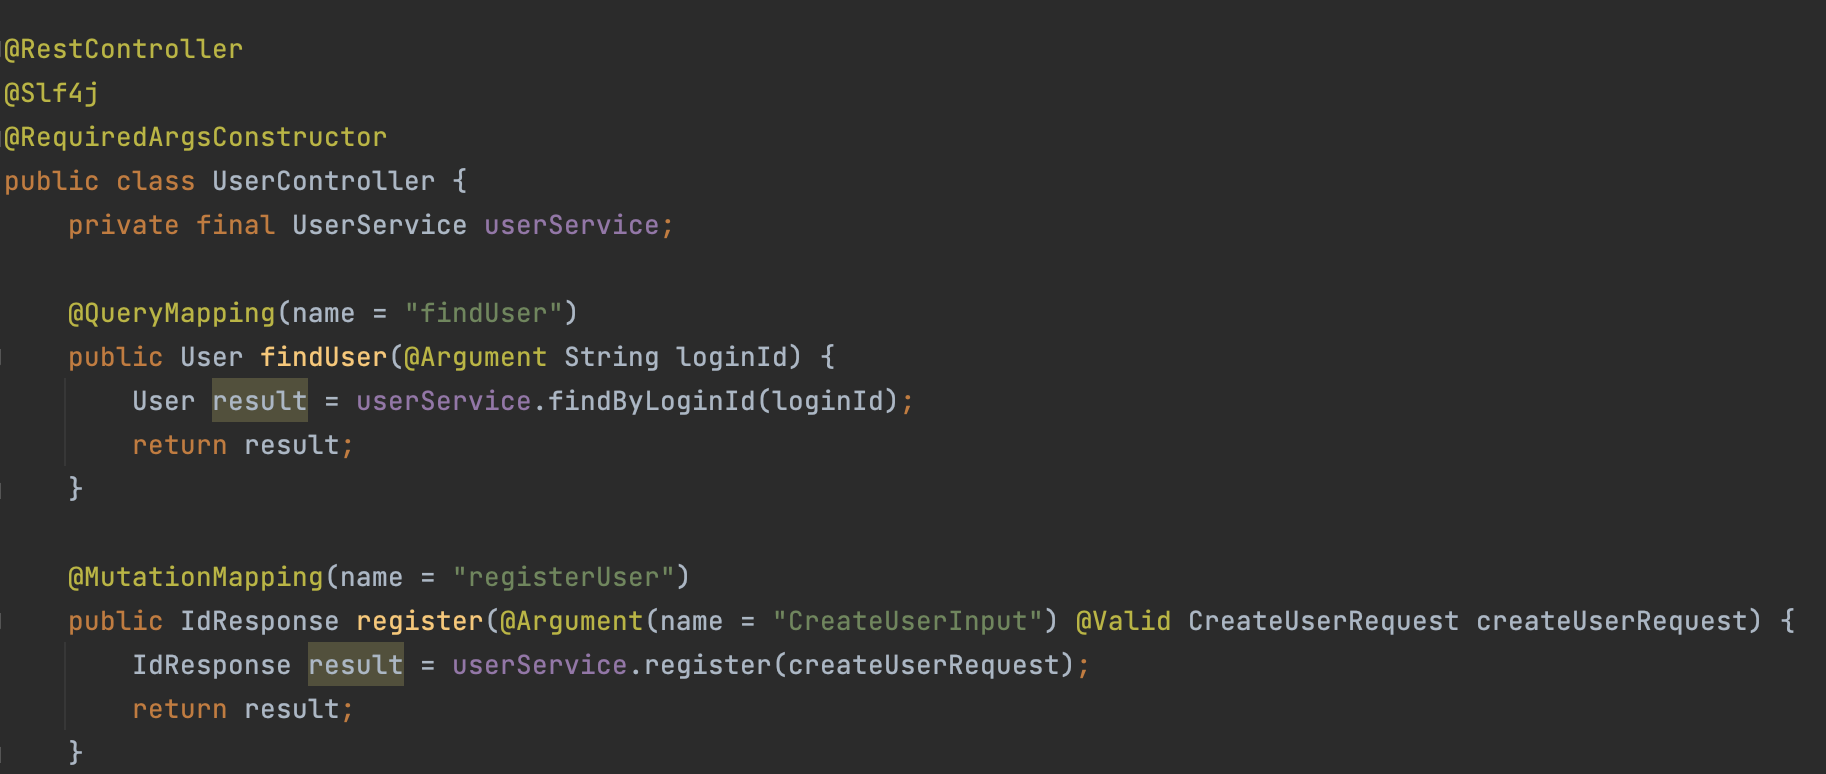
먼저, schema.graphqls에 맞춰 @QueryMapping, @MutationMapping하는 작업이 필요합니다.
REST에서 @GetMapping, @PostMapping과 동일한 개념입니다.
방금 registerUser 뮤테이션을 이용할 때 CreateUserInput 타입으로 Request를 보냈습니다. 하지만 컨트롤러 계층에서는 CreateUserRequest라는 Dto를 이용하기 때문에 둘을 @Argument의 name 필드를 이용해 매핑해야 합니다.
간단하게 SpringBoot를 이용해 GraphQL을 구현했습니다.
보통은 클라이언트와 서버 둘 다 Apollo 라이브러리로 GraphQL을 이용하는 것 같습니다.
스프링 생태계에서도 GraphQL을 지원한다는 점이 흥미롭네요.
그럼 이만~
'Spring 기초' 카테고리의 다른 글
| Spring Batch Job Parameter 사용하기 (0) | 2023.12.04 |
|---|---|
| SpringBoot + GraphQL (1/2) (0) | 2023.07.13 |
| Openfeign으로 외부 API 호출하기 (1) | 2023.05.28 |
| WebSocket & STOMP 그룹 채팅방 구현하기 (4) | 2023.05.16 |
| [SpringBoot] Annotation을 이용해 Slack에 Error log 남기기 (0) | 2023.03.18 |